ProtocolComplete protocols in SATAY.
Overview
To start, you need a strain that is ade2- (the ade2 deletion must be done with the appropriate primers #6 and #7 below[1]) and ura3-. Alternatively you can use the strain ByK352.
The complete protocol start with library generation, then DNA preparation, then sequencing, and bioinformatics analysis.
Primers
6 Ade2PriFwd GTATAAATTGGTGCGTAAAATCGTTGGATCTCTCTTCTAAcggatccccgggttaattaa
7 Ade2PriRev TATGTATGAAGTCCACATTTGATGTAATCATAACAAAGCCgaattcgagctcgtttaaac
[1] The reason is that you want to eliminate any sequence that could allow the repair of ADE2 by homologous recombination rather than through transposition.
Library Generation
- Transform your favorite strain with pBK257 (Gal-transposase/MiniDs/CEN URA)
- O/N preculture of pooled transformants in 1L SD-URA 0.2% glucose 2% raffinose to saturation.
- Concentrate cells
- Spread cells on transposition plates (SD-ADE 2% Galactose)
- Wait 21 days
- Harvest
- Re-seed harvest in 2l SD-ADE 2% Glucose, 2,500,000 cells/ml – let grow O/N until saturation
- Harvest – wash cells – aliquot – freeze pellets
Note: [1] in bold are important parameters; [2] in italic are useful tips.
Notes before you start
- We (Kornmann lab) have only worked so far with BY4741 and BY4742 genetic backgrounds. Our collaborators have had trouble getting the transposon to jump in other background. Therefore, if you need to use another genetic background, we strongly advise that you perform a small-scale transposition first, with our strain as a positive control.
- This protocol will reliably yield 120 to 250 clones per cm2 (meaning 120 X55cm2=6600 clones/plate to 250X55=13750).
- You want to aim for 2 million clones. Increasing the number of clones will increase the number of hits, although not proportionally, and it might not be worth the extra effort. My first library contained 1.6 million clones and yield 250 000 independent hits. My second library contained 4.7 million clones and yield 350,000 independent hits. The overall sequencing profile of the two libraries was remarkably comparable.
- Plating 350 plates will be sufficient (that accounts for the plates you will have to trash due to mold contamination).
- If you compare two libraries (control and experiment), I would strongly advise that all media (plates and liquids) be the same for the control library and the experiment library. If you need to pour the plates in batches, then I would advice that you distribute the plates from the different batches equally between the control and the experiment library.
- The success of the protocol relies on proper amounts of
cells being plated or inoculated. These parameters are critical to
ensure:
- Efficient transposition for optimal coverage of the genome
- That the transposed clones are well represented during the re-seeding step
- The three steps at which the cell concentration is important are:
- The preculture of the pBK257 transformants, which is done directly from the transformation plate.
- The plating to induce the transposition (done from the previously mentioned pre-culture grown over night) ← This Is The Most Crucial Step For Efficient Transposition
- The reseeding of the harvested library.
The number of cells and their distribution on the plate is important for transposition efficiency and to ensure the transposed clones are of homogeneous size. It is critical that the cells are put at the proper density before plating and also plated very homogeneously over the entire plate.
Plating too many cells inhibits the transposition. Plating too few decreases the number of clones. We are aiming fro an optimum here.
The best way to estimate if the plating is satisfying is:
- do a small scale experiment with different concentrations to see which works best in your hand (our spectrophotometers might say different things, so it is probably wise to test if you need to make some adjustments).
- observe the cell density after plating under a 10X objective, and compare to the pictures added to this protocol. Those pictures illustrate the “do” and “don't”
Reagents
- Plates
- 2 X SD-ADE
- 10 X SD-URA
- 250-400 X SD-ADE 2% galactose (25ml-55cm2) - Plates can be kept for a few weeks at 4°C. Prepare 10L for ~400 plates (10,000ml/25ml=400)
Recipe for 1L SD-ADE 2% galactose plates:
- Autoclave 1.7g Yeast Nitrogen Base (without Ammonium Sulfate), 5g Ammonium Sulfate in 300ml ddH2O
- Autoclave 20g Agar in 500mL H20
- Combine both autoclaved solutions
- Add 100ml of 10X AA-ADE
- ⚠ Not all AA formulation work! The recipe that we use is here. The CSM formulation from forMedium also works well.
- Add 100ml 20% Galactose (previously autoclaved)
- Pour 25ml per plate. (← this is standard procedure by us. We don't know if that makes any difference but we imagine it could).
- Solutions
- SD-URA 0.2% glucose 2% raffinose (1L)
- SD-ADE 2% glucose(2L per experiment – more if library is over 5 million clones, see below
- 1L ddH2O
Material
- 30C shaker
- 30C incubator or room
- Sterile glass flasks (2L + 5L)
- Sterile glass flask (250ml)
- Sterile glass beads (~200ml per experiment)
- 50ml falcon tubes (~10) or any conical tube to collect the cells and that can stand 1600x g.
- Dispenser with a sterile 5ml tip (have a few spare tips, you will probably go through 2 or 3)
- Sterile glass beaker (or anything sterile and large enough to keep the tip of the dispenser clean without having to remove it).
- Glass rake (I make mine out of a pasteur pipette)
- Sterile glass beaker to store the rake(s)
- Spectrophotometer
Protocol
If necessary, delete ADE2 in your strain of interest (primer sequence available upon request), or engineer our mutation in ByK352.
The week before the experiment: Transform pBK257 into your strain(s) of interest, plate on SD-URA. Plate on ~10 plates and aim for ~500-800 colonies/plate (you'll need enough transformants for inoculation. The rationale is to minimize the number of cycles each transformant is going through, because spurious transposition in glucose/raffinose can happen. Spurious transposition will create ADE2+ clones which will have an obvious growth advantage on the SD-ADE galactose plate and will waste sequencing reads).
- Day 0
- Put SD-ADE 2% galactose plates O/N in 30°C room. (I keep my plates in their own plastic sleeves and I leavethe bags/plastic sleeves open to eliminate condensation. I store the plates in a cardboard box. I leave the box open but I tape the adjacent flaps together, so as to make a “wall” that protects the plates from our 30C room ventilation.)
- In the early afternoon, scrape many colonies and put the cell in a small volume (10-50 ml) of medium. Measure the OD of the harvest and use it to inoculate a 1L SD-URA 0.2% glucose 2% raffinose culture at an OD600=0.14 – 0.16 (the 0.2% glucose allow for a smooth diauxic transition from glucose to raffinose).
- Grow at 30°C on shaker for 18-20 hours.
- Reserve sterile glass beads.
- Reserve a bag of 50mls falcon tubes (or conicals).
- Day 1
- Measure OD600. Expect OD600~3.5 after 18-20h (always dilute 10X to read OD above 1).
- Take an aliquot of the O/N culture, dilute 25000X and plate 200microl on 2 SD-complete, SD-TRP, SD-HIS and SD-URA plates so as to obtain ~350 colonies per plate. This is just to check that the cells are ok and that most contain the plasmid (in case transposition does not work well). It is not unusual to find out that up to 30% of the clones have become ura-.
- For OD600=3 and up:
- concentrate the culture to OD600=35(*)
- plate 200 microl per plate using 5-15 glass beads per plate (oddly we found that this is actually important not to use too many beads).
(*)For example, if OD600= 3.8, then you need to concentrate 35/3.5=10X. Spin culture 5min at 600x g at RT, discard 90% of the volume, mix pellet with remaining sup, plate 200 microl per plate. If using 50ml falcon tubes, it is ok to do 2 rounds of spin. In this case, remove entirely the first sup, add 50 ml culture, spin, remove 40ml (i.e 80%) of sup, mix pellet with remaining sup and plate. We found these conditions optimal for our spectrophotometer. You may want to figure what they are for your spectro.
Note
- Always plate 200microl (as I say below, plating homogeneously is key)
- Adjust concentration fold so that the OD600 after concentration is 35. By increasing the density above 35, you will not increase the number of clones but you will run into the risk of not plating homogeneously. An OD600 of 40 will still be ok. Above 70, you start running the risk of lowering your yield, notwithstanding that achieving homogeneous plating is going to be difficult. At 100 you will get less than 5000 clones per plate. The clones will be very small and buried in a mass of untransposed ade2- cells.
- Use a dispenser with a sterile tip, that will make your life much easier. While I am spreading the plates, I am keeping the tip of the dispenser in a sterile place (like a sterile glass beaker)
- Plate very homogeneously - The key is to achieve a thin layer of cells on the whole surface of the plate. You can observe the plating using a stereomicroscope or a 10X objective: about 80% of the plate should be covered. See pictures for an idea of what the ideal and non ideal plating look like. In the end, it is the density on the plate that matters, so the best is to refer to the picture and to do a test run to figure out the density that works best in your hands (again, our spectrophotometers may have slightly different readings )
- To achieve and homogeneous plating, I do as follow:
- Dispense 200μl onto 10 plates (already containing the beads)- This is stack 1
- Spread the liquid onto the entire surface of the plate, using a gentle circular motion, making sure the beads remain on the plate. Stop when the liquid starts to penetrate the plates. At this point, the cells form an homogeneous film that is just starting to be absorbed.
- Repeat with another stack – This is stack 2
- Gently shake stack 1 using straight motions, 2-3 times in 4 directions. After this step, the liquid should be fully absorbed. The cells form a monolayer, that occupies 50-80% of the surface of the plate (observed under 10X magnification). By eye you can see patterns on the surface of the plate.
- Remove the beads immediately (don’t let them sit)
- Repeat
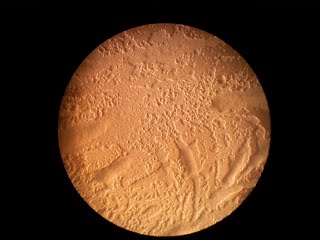
Example of "good" plate after cell spreading, as seen with a 10X long distance objective. This density (200μl of a suspension at OD38 plated) will yield ~170 clones/cm2
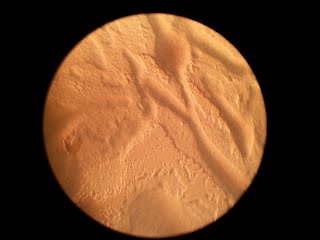
Example of "bad" plate after cell spreading. This density (suspension at OD77) will yield ~50 clones/cm2
Note: adjust the number of plates per stack, if necessary (If the liquid does not get absorbed fast enough, increase the number of plates per stack)
- Plate as many plates in total as possible. It is better to decide not to harvest all of the plates than to find out that you don't have enough to achieve a good coverage. Take into account that ~10%-15% might become moldy over the 3 weeks time that the transposition requires!!!
- Work as cleanly as possible to minimize moldy plates.
- Plate 200μl on a few SD-ADE 2% glucose plates. This step controls for transposition having occurred before exposure to galactose. I would plate one SD-ADE plate per independent batch (say you use 6X 50ml falcon tubes, that is 6 independent batches: use one SD-ADE plate per tube) and I would label the SD-ADE plates according to their corresponding batches. ADE+ clones that have been generated before exposure to galactose will show on the SD-ADE plates and on the SD-ADE galactose after 2 days. Don't throw the plates if this happens. We can discuss on how to proceed.
- Place the plates in closed plastic sleeves/bags (and then back in their card box). Leave an opening for air flow (do not seal tight to avoid growth in anaerobie and accumulation of condensation) but make sure the plates will not dry out.
- Day 2-3
- Check plates: SD-ADE should have no colonies – Have a look at a few of the SD-ADE galactose plates: they should also have no colonies. Count SD complete, SD-TRP, SD-HIS, SD-URA plates.
- Check plates for mold! Remove moldy plates, wipe any plate preceding and following moldy plates in the stack with 70% EtOH.
Here is an approximate timing of what should happen next. No need to follow it precisely.
- Day 6
- Check plates for mold! Remove moldy plates, wipe the preceding and the following plate with 70% EtOH. Do it again in the following days.
- Day 10-12
- Clones should start appearing ^_^. They will be visible under the stereomicroscope and 10X objective. Don't panic if you don't see any, this is still very early.
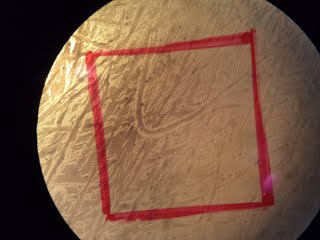
Plate after 10 days. Observed with a binocular - Red square = 1cm2
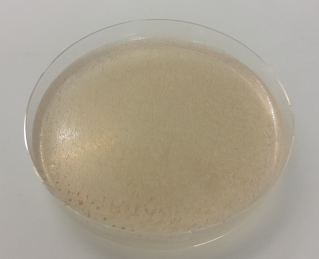
Same plate
- Day 13-15
- You should start seeing the clones by eye. If all plates have equal clone density, pick 10 plates and count as below. If plates seem to have have unequal clone density, try to make categories and pick a few plates per category to proceed. This is important to get an approximate number of clones.
- Draw 1cm2 on each selected plate. Count clones within this area using a stereomicroscope (and a permanent marker). Note the number and the date on the plate (see picture).

13 days (compare to 10 days, see above)
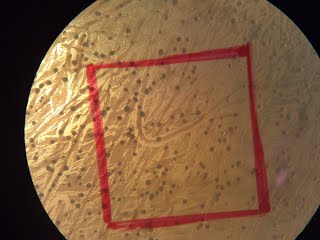
14 days (compare to 10 days, see above)
- Day 16-18
- Count additional clones within the same areas as before (use a marker of a different color). Note number and date on the plate.
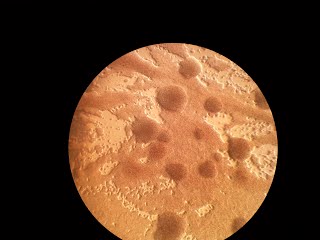
"Good" plate after 17 days
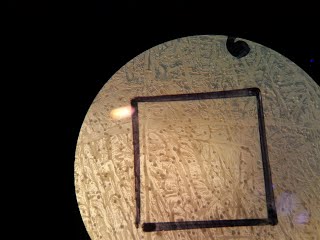
Same plate as above but seen through stereomicroscope. The square is 1cm2.

Bad plate after 17 days
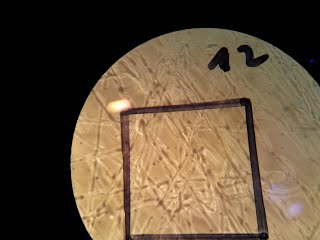
Same plate as before seen through stereomicroscope
- Day 19
- Count additional clones within the same areas as before (use a marker of a different color). Note number and date on the plate. By then you should notice that the number of clones does not increase as fast as before.
- Day 20=day before the harvest
- Get a final count for your number of clones
- I pick a few (~20) clones from the transposition plate (I use the stereomicroscope) and I streak them on SD-ADE 2% glucose plates. This is to check that the clones are all still alive. This is important because you want to make sure that all of your clones will grow in the SD-ADE 2% glucose culture, following the harvest.
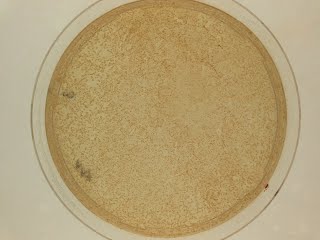
This is how your plates should look like by now. This one has a density of ~170 colonies/cm2. Suspension at OD38 was plated.
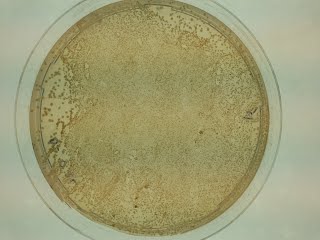
This is what happens when a plate is plated with proper density but not homogeneously spread; some colonies are very big and some are very small.
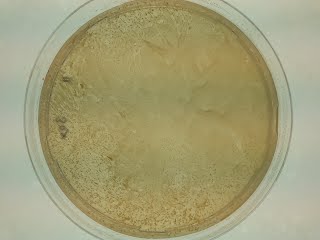
This is what happens when the plate is overcrowded (suspension at OD99 was plated).
- Harvest day
Work in pairs (or triplets, see video below). Count 3 hours for 2 people to harvest 350 plates (or 2 hours for three people), plus some time to calculate your re-seeding dilution.
- Prepare and pre-warm 2 liters of SD-ADE 2% glucose. (If your library is above 5 million clones, you may want to increase that volume: you want to inoculate at least 1000 cells per clones, at a density of 2.5E6 cell per ml (OD=0.2 on our spectro). Thus, 2 liters is 5E9 cells, meaning 5E9/5E6=1000 cells per clone on average. If you have more clones, this number decreases and you may want inoculate a larger volume).
- If you don't have a glass rake, make one by flaming a Pasteur pipette – Keep it in a sterile glass beaker.
- Proceed with batches of 5 plates (more if that works for you), as follow:
- Person 1 distributes 2 ml ddH2O per plate
- Person 2 scrapes one plate (I like to keep the plate flat on the bench and rotate it), gathers the liquid to one “side” of the plate, and handles the plate to person 1 (keeping it tilted) or places the plate on a wedge.
- Person 1 pipettes the liquid from all 5 plates into a sterile 250ml glass Erlenmeyer. Meanwhile Person 2 handles the next 5 plates to person 1.
- Make suitable dilution to measure the OD600 of the collected cells and count cells with a cytometer.
- Inoculate the 2 liters at a final concentration of 2.5E6 cells/ml (that is OD=0.2 on our spectro). My advice is to inoculate less than what you have calculated, measure, then adjust.
- Proceed as above for every growth condition to be tested.
Here is a video illustrating the choreography with three people
- Day after harvest
- Collect at least 600ml of saturated culture (OD~4), 5min, 1600g, Room Temp. Do two rounds if necessary (If not limited by centrifuges, spin the whole 2 liters. You'll have more material to mess around).
- Wash the equivalent of 600ml culture with 150ml ddH2O (5min, RT, 1600x g).
- Weight the pellet(s). 600ml culture at OD600~4 should yield ~4 gram pellet.
- Resuspend the pellet in minimal amount of ddH2O
- Distribute in microtubes so that each tube contains ~500mg packed cells.
- Spin (5min, 1600g or a few sec at 16000g), remove all of the sup, store at -20°C.
DNA Preparation
DNA preparation is done according to well established protocols.
- A 500 mg cell pellet is resuspended with 500 μl Cell Breaking Buffer (2% Triton X-100, 1% SDS, 100 mM NaCl, 100 mM Tris-HCl pH8.0, 1 mM EDTA) and distributed in 280μl aliquots.
- 200 μl Phenol:Chloroform:Isoamylalcool 25:25:1 and 300 μl glass 0.4-0.6mm unwashed glass beads are added to each aliquot.
- 200 μl TE are added to each lysate, which are then centrifuged for 5 min at 16100x g, 4°C.
- The upper layer (~400 μl) is transferred to a fresh tube,
- 2.5vol 100% EtOH are added and the sample mixed by inversion.
- DNA is pelleted for 5 min at 16100x g, 20°C.
- The supernatant is removed and the pellets resuspended in 200 μl RNAse A 250 μg/ml for 15 min at 55°C, 1000 rpm on a Thermomixer comfort (Eppendorf).
- 2.5 vol 100% EtOH and 0.1vol NaOAc 3 M pH5.2 are added and the samples mixed by inversion.
- DNA is pelleted by centrifugation for 5 min at 16100x g, 20°C.
- The pellets are washed with 70% EtOH under the same conditions, the supernatant removed completely, and the pellets let dry for 10 min at 37°C.
- The pellets are resuspended in a total volume of 100 μl water for 10 min at 55°C, 700 rpm on a Thermomixer comfort (Eppendorf).
- DNA is run on a 0.6% 1X TBE agarose gel against a standard 1 kb GeneRuler, and quantified using FiJi. 500mg cell pellet should yield approximately 20-60 μg DNA. Always quantify on gel. Absorbance reading of this sort of "dirty" preparation yields entirely meaningless results!!!
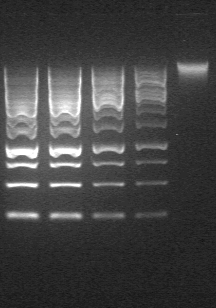
Figure 1. Agarose Gel of genomic DNA. Lanes 1-4 are 10, 8 4 and 2μl of the marker (Generuler 1kb, 440ng/6μl). Lane 5 is 5μl of a 10x dilution of genomic DNA. Pictures should not be saturated when doing a gel quantification (unlike here ...).
DNA Sequencing
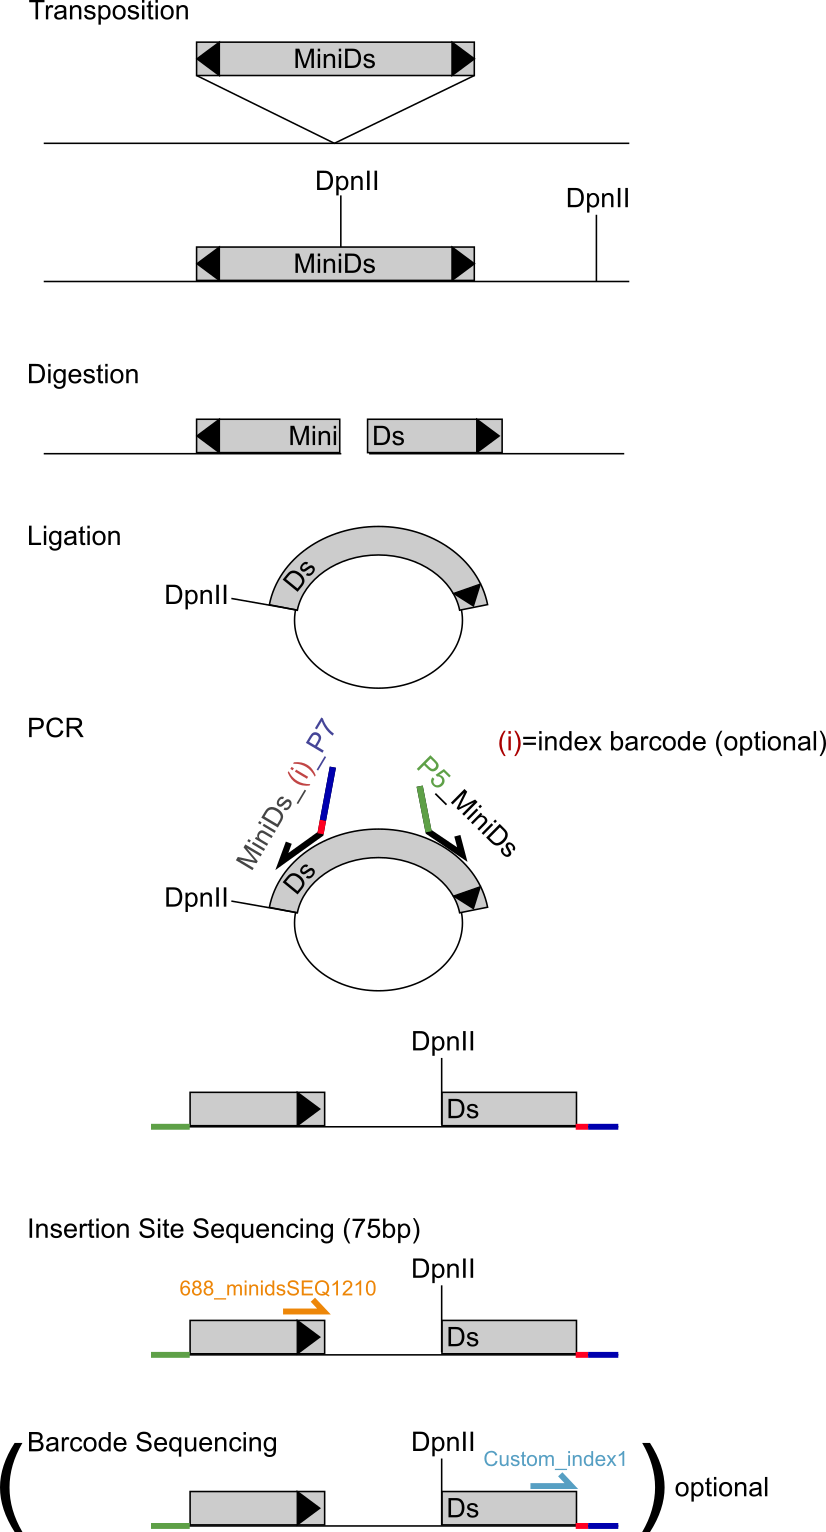
Sequencing involves the following steps:
- Digestion of genomic DNA with two four-cutter restriction enzymes
- ligase-mediated circularization of the DNA
- PCR of the transposon-genome junctions using outward-facing primers
- Illumina-sequencing of the combined PCR products
The picture below schematizes the procedure (for DpnII here, but the idea is identical for NlaIII):
Protocol
- Digestion
- 2x 2μg of genomic DNA are digested in parallel in Non-Stick microfuge tubes (Ambion AM12450) with 50 units of DpnII (NEB #R0543L) and NlaIII (NEB #R0125L), in 50μl for 16 hours at 37°C.

Figure 1. Typical digestions. Lane 1, marker, Lane 2, NlaIII digestion (2μl: 80ng), Lane 3 DpnII digestion (2μl: 80ng). The marker is GeneRuler 1kb.
- Circularization
- The reactions are then heat inactivated at 65°C for 20 min and
- circularized in the same tube by ligation with 25 Weiss units T4 Ligase (Thermo Scientific #EL0011) for 6 hours at 22°C, in a volume of 400μl.
- DNA is precipitated overnight or longer at -20°C in 0.3 M NaOAc pH5.2, 1ml 100% EtOH, using 5 μg linear acrylamide (Ambion AM9520) as a carrier, then centrifuged for 20min at 16100x g, 4°C.
- Pellets are washed with 1 ml 70% EtOH, for 20min at 16100x g, 20°C.
- After complete removal of the supernatant, pellets are dried for 10 min at 37°C.
- PCR
- Each circularized DNA preparation is then resuspended in water and divided into 10X 100μl PCR reactions.
- Each 100μl PCR reaction contains: 10μl 10X Taq Buffer (see recipe below), 200μM dNTPs, 1μM primer #1, 1μM primer #2 , 2.4 μl homemade Taq polymerase.
- PCR are performed in an MJ Research Peltier Thermal Cycler PTC-200 using the following conditions:
Block: calculated - 95°C 1 min, 35X [95°C 30 sec, 55°C 30 sec, 72°C 3 min], 72°C 10 min.
- The 2X 10 PCR reactions are pooled into one NlaIII-digested pool and one DpnII-digested pool.
- 100μl of each pool are purified using a PCR clean-up/gel extraction kit (Macherey-Nagel) according to the manufacturer protocol, with the following modifications. DNA is bound to the column for 30s at 3000x g; 30μl of elution buffer (10mM Tris-HCl pH8.5, 0.1% Tween) is applied to the column and incubated for 3min, then spun for 1min at 11000x g at 20°C. The eluate is reapplied to the column and a second elution is performed under the same conditions.
- Purified PCR products are quantified by absorbance at 260 nm.
- On a 1% agarose gel, the product runs as a smear from 250bp to 1.2kb, with highest density centered around 500bp. The 867bp size band present in the NlaIII treated sample and the 465bp size band present in the DpnII treated sample correspond to untransposed pBK257.

Figure 2. Three successfully PCR-amplified libraries. Left, NlaIII-digested, right, DpnII-digested. Note the band corresponding to the remaining non-transposed ADE2-MiniDs. The important part is the smear here. The marker is GeneRuler 1kb.
- Sequencing
Equal amounts of DpnII- and NlaIII-digested DNA are pooled and sequenced using MiSeq v3 chemistry, according to manufacturer, adding 3.4μl of 100μM primer #3 into well 12 of the sequencing cartridge.
Reagents
- Non-Stick microfuge tubes (Ambion AM12450)
- DpnII (NEB #R0543L)
- NlaIII (NEB #R0125L)
- T4 Ligase (Thermo Scientific #EL0011)
- linear acrylamide (Ambion AM9520)
- 10x TAQ buffer: 500 mM Tris-HCl pH9.2, 22.5 mM MgCl2, 160 mM NH4SO4, 20% DMSO, 1% Triton X-100 - stored at -20°C
- PCR clean-up/gel extraction kit (Macherey-Nagel)
Primers
- P5_MiniDs
AATGATACGGCGACCACCGAGATCTACtccgtcccgcaagttaaata
- MiniDs_P7
CAAGCAGAAGACGGCATACGAGATacgaaaacgaacgggataaa
- 688_minidsSEQ1210
tttaccgaccgttaccgaccgttttcatcccta
(Optional – Barcoding/Indexing/multiplexing)
Barcoding your library might allow you to pool several libraries in the same run, especially if you are using a machine with a higher throuput than the MiSeq. To barcode libraries, an 8bp index is placed within the MiniDs_P7 primer as follows: MiniDs_P7 CAAGCAGAAGACGGCATACGAGAT_(index)_acgaaaacgaacgggataaa Oligonucleotide sequences © 2016 Illumina, Inc. All rights reserved. Derivative works created by Illumina customers are authorized for use with Illumina instruments and products only. All other uses are strictly prohibited.
The index sequences that we have been working with are derived from the D701-D712 TruseqHT indexes (The index sequence in the primer must be the reverse complement of that in the TruSeq document in the link).
The index are then read using a custom indexing primer
custom_index1 GGTTTTCGATTACCGTATTTATCCCGTTCGTTTTCGT
Be careful, when mixing different indexes, to make sure that, at the first cycles, the machine reads a combination of A, T, G, and C (e.g. having all indexes starting with a T could confuse the sequencer, more details here).
Please discuss the approach with your sequencing facility staff, as we have only moderate experience with pooling libraries.
Bioinformatics Analysis
Bioinformatics analysis is made in four steps:
- Trimming of unwanted sequences (basically anything behind the NlaIII or DpnII sites)
- Alignment to the yeast genome
- Determination of the precise transposon insertion site and counting of the number of sequencing read per transposon
- Output of a BED/WIG file for visualization

